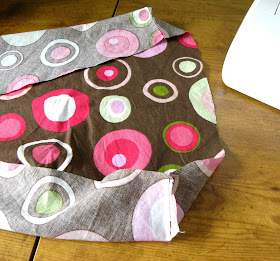
 I should have done this sooner! It was really easy and my old cover was so stinking gross. All the tutorials I found had casings with drawstrings and I just wanted elastic so I did it my own way and it worked just fine.
Supplies:
Fabric (measure length of your board and add 8"-10")
Pkg 1/4" Elastic
Sewing Machine
Roatary Mat & Cutter or Scissors
Lay your fabric out, place board over it and cut about 3" outside the edge all the way around. I cut a bit less on the back end because we use the metal iron holder and I didn't want to cover it.
 Pinch and pin the front end in the middle
 Do that two more times, one on each side
Remove pin and cut all three chunks of fabric to get rid of some bulk
 Go to the back end and do the same thing once on each corner
 With right sides together, line the cuts up and sew a straight line down each
 It will look like this on the front end:
 and like this on the back end:
 I used my overlock foot that I talked about here and used an overcast stitch all the way around. I kind of wish I hemmed it so I'd recommend doing that instead.
 Here's how it looks so far:
 Now to add the elastic. Start at your front end by marking about 6" from your outtermost seams. Zig-zag stitch your elastic from one mark to the next, pulling tight as you go.
 I left the old cover on and just put this over it. Make sure you leave the foam alone because it's a specific heat-resistant kind.
Let me know if you use this tutorial and show me your finished product!
~Star


 Repeat on back end the same way; mark about 6" out from each seam then attach elastic in the same manner.


Hi There! Stopping by from Marketing Mondays and I am so glad I found your blog! You have so great ans cute stuff! I am always looking forward to reading new blogs and if you get a chance you can swing by mine at www.miamamiah.com Have a great week and I look forward to blogging with you! I absolutely love the fabric you chose for your ironing board it is almost identical to my daughters bedroom decor. I wish I could sew though!
ReplyDeleteGreat....one more thing to add to my project list :). I love your fabric!
ReplyDeleteI love this project! I've never given much thought to decorating the iron board. Very cleaver.
ReplyDeleteI so need to make one of these. My ironing board cover is beyond old and grungy! I love the fabric you chose! Come join my link party every thursday!!!
ReplyDeleteterelauritsen.blogspot.com
I came across your blog and saw this tutorial. I was so excited to try it out because my ironing board has seen much better days. :) So tonight I did it and it turned out great! Thank You!! Your tutorial was very easy to follow.
ReplyDelete-Angie
Hi, I found your blog and love this post in particular. I have wanted to make one for so long and I love your detailed pictures! Thanks for posting this.
ReplyDelete~ Jessica
Hi, I found your blog and love this post in particular. I have wanted to make one for so long and I love your detailed pictures! Thanks for posting this.
ReplyDelete~ Jessica