***Please always use extra caution when wearing baby (especially newborns and sleeping babies) and do your own research on the safety issues as that's not what is covered in this tutorial. I know a few things for sure; make sure baby's face is visible, their chin is off their chest and please note that jersey wraps should not be used for a back carry hold.
EDITED TO ADD: Check out my more recent tutorial of a one-sided baby wrap here.
I love my wrap! It doesn't hurt my back and it's easy to stuff in my diaper bag.
Remember my original post about making a baby wrap here? Well I've totally overhauled it and come up with an even better one for ya. This one has a cute fabric support panel in front, it's way less bulky, it makes 3 wraps instead of just 2 AND it's reversible so it's like you're getting 6. So here goes!
You'll need:
2 cotton squares of fabric 22"x22" (optional)
Sewing machine (only if adding panels)
Rotary mat & cutter
5.5-6 yards jersey knit fabric that is the same on both sides
Lay out your huge fabric STILL FOLDED like it was on the bolt. If the edges are messy (big holes, rough spots or discoloration) then trim those off. If there are just small holes, those should close up after washing & drying. I normally recommend washing and drying first but the edges will curl so much in the wash that you should wait til it's cut then wash and dry it before adding the panels.
Measure the entire width (should be 60" or more) and divide that by 3. You should get about 20" or more. Half that number... this is how far from the FOLD you will cut your fabric. Get it? See how you'll have 3 wraps approximately 20" wide once you cut? Continue cutting that far from the fold for the entire 5.5-6 yards.
Now either leave the edges alone or taper them. If you don't taper, the knot you tie in front will be a little more bulky but I still prefer not to taper because if you do, that part does not look as clean as the rest because when jersey fabrics are cut diagonally, their edges don't curl. You decide...
To taper, take a wrap and lay one end of it on the table FOLDED in half like the picture below. Starting about 20" or so from the end, taper all the way to the end leaving about 4" on the end (so really only 2" since it's folded)
Open it up so it looks like this:
Now round the sharp corners
You can stop here if you want and it looks great!

Or you can get out your panels, trim them so they're the same height as your wrap, and iron the sides that you DID NOT TRIM under about 1/2" (so wrong sides are together).
Here are my 2 already ironed.
Now put the right sides of each panel together and make sure the edges line up
Now find the center of your wrap and add pins to mark it. I tried ironing those dang edges flat but they just curled back up so don't bother. That is why there are wet spots on my fabric in case you're wondering :)
Place the panels (with their right sides together still) on top of the wrap at the very center using your pins as a guide.
Pin them to the wrap on both the top and bottom raw edges.
Sew 1/4" from edge where you pinned
Here it is sewn on the top and bottom.
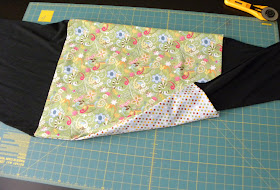
Lift both panels and stuff one side of your wrap through the opening
Here's what it will look like at this point:
Now lift your top panel and stuff one side of your wrap through opening
Now it looks half-way decent!
See the seam?
It needs to be ironed flat
Once ironed, pin sides of panel to your wrap so you can top stitch around the whole thing and close those sides
Top stitch as close to the edge as you can. Remember that the thread has to go through the fabric on the opposite side too so you might not be able to get as close to the edge as you want unless you made sure those 2 panels were lined up PERFECT. I used a green thread for this top side and a blue bobbin thread for the under side.
Here is one side of my finished product:
and here is the other side:
See my front and back?
Cute baby girl, cute wrap and even though she'd only been in it for 2 minutes, it was already covered in drool - it didn't stand a chance.
She even managed to get both sides!!
Front shot:
Back shot:
Click here for a video demo on wearing your wrap and your baby.
~Star


