Pages
▼
Saturday, March 26, 2011
Tutorial: How To Make Curtain Rod
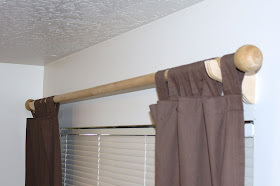
I'm not sure if this is really worthy of a post or even if this can be called a tutorial but here's an easy project for someone looking for a wood curtain rod like I was.
All the furniture in my kids' room is natural wood and so I wanted their curtain rod to match but the only one I found locally was really expensive so I made my own. I found the rod at Home Depot for $8 after cutting it to the size I needed (price will vary depending on how much you cut) and the two balls were a buck each at Michaels with my coupon. I gave in and bought the set of brackets from Home Depot for $9 (and they do match although in the picture you wouldn't know it) so all in all it cost a total of $19 which isn't amazingly cheap but still decent.
All you have to do is drill holes in the ends of the rod and in each ball then wood glue a little dowel to attach them. Done :)
Sunday, March 13, 2011
Tutorial: How To Make A Ruffled Monogram Pillow
Here is an adorable pillow for a little girl's bedroom that you can personalize with her initial.
I used my Cricket to cut this letter "M" but you could easily print it then trace it onto your fabric and cut. This was my first time cutting fabric with my Cricket machine (using these instructions) and it worked great.
It was also my first time applying an applique. I'd had the stuff to do it forever but was intimidated. For no reason I might add. It was so easy. All you need is Fray Check, Heat n' Bond and a somewhat simple shaped applique. For me, sewing around the applique was too hard when I used a super curvy font (i.e. "Curlz").
So this is what you do:
Cut out two squares for your pillow in any size you choose. Also cut out a letter (or anything else you want to use for your applique) and apply Fray Check to the edges. Cut four strips of fabric for you ruffle that are each about 1.5 times as long as one of your pillow's sides, fold them over length-wise with wrong sides together and iron.
Then open them up and sew them right sides together on the shorter sides until you have a big loop. Iron the seams open and then re-iron it length-wise over the seam. Come to think of it you might as well just wait to iron the entire thing lenth-wise until after you've sewed each strip together.
Now gather the whole thing by sewing the raw edges together with an extra long stitch length and pulling on the ends.
Now attach the ruffle to the right side of one square with pins. Use your seams as a guide by pinning them to the corners so that it's all even. Speaking of corners, make sure your ruffles aren't bunched right there because mine were sloppy and I had to use my seam ripper and redo them after sewing over the outter edges of my ruffle the first time.
Use your Heat n' Bond to apply your applique to the other square. Once attached you can sew around the edges of the letter using your zig-zag stitch and a very low stitch length setting.
Next, take your monogramed square and lay it face-down on top, right sides together, and re-pin, removing the pins used in the previous step as you go.
Now you're ready to sew! Leave a small opening to pull it right side out through (it's best if this opening is in the center of two corners instead of at a corner). Once right side out, stuff with batting and sew opening shut using invisible thread or a matching thread if fabric is a solid color.